Showing posts with label crafts. Show all posts

how to write with sparklers.

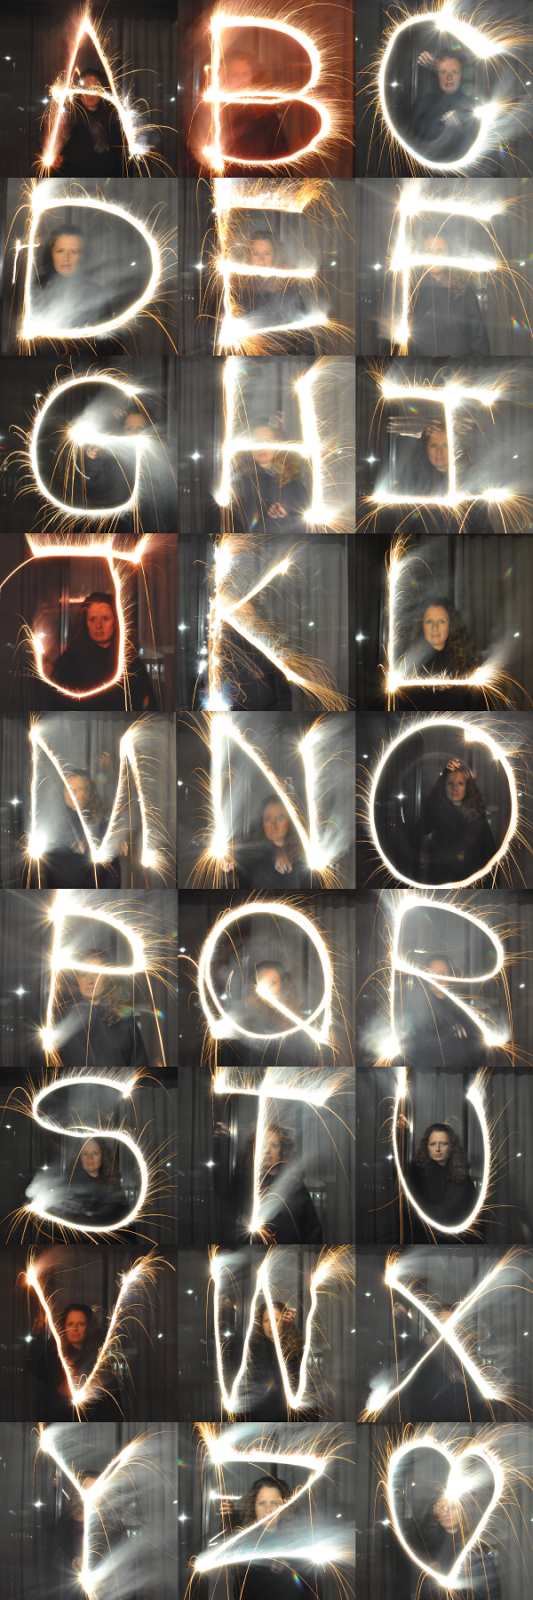
a sparkler photography tutorial: how to write with sparklers + catch it on camera!
{please excuse any grumpy or weird faces...I should work on my pleasant resting face!}

When we made our big announcement a few weeks ago, I promised a post on writing with sparklers. I thought it was only appropriate to share those tips in the week leading up to the Fourth of July. In typical {av} fashion, I did a fair amount of research to prep for our first attempt at sparkler writing. These five tutorials gave me the most insight into the final product: The College Prepster | A Little SussySociety Bride | Pixels & Co.This is Life? 

PREPARATION:
-This is one activity you cannot do alone. Unless you've mastered the art of using a self-timer in the dark, you are better off have a partner-in-crime for this adventure.
-You are best served buying a few packs of "Morning Glory" sparklers. These are larger scale sparklers with a longer burn time. Depending on your state's firework laws, you may have to do some digging to find this type of sparkler. Thankfully, I was able to find them in the dollar bins at my local Wal-Mart and Target. I've heard rumors about three-minute sparklers, but I was never able to find those myself.
-While you're at it, you should also purchase a real "long" lighter--not matches. Sparklers can spark {crazy, right?}, so having something which can give you some distance from the sparkler itself is key.
-Maximize the visibility of your message by wearing dark clothing from head to toe {preferably long sleeves and pants}. Lighter clothing will show up in your photos and distract from the sparklers.
-Borrow or buy a tripod. With the longer exposure, you will need your camera to stay perfectly steady in order to capture the sparklers. If you don't have access to a tripod, scout a few spots during the day where you can confidently place your camera. You wouldn't want any unfortunate camera mishaps in the dark.
-Try to stay away from streetlights and any other large light sources. This may seem obvious, but it is worth saying. It may take some time to get your bearings with your camera in the dark, but practice a bit inside before you head out into the darkness.
-As an aside, you may want to bring a vase or glass full of water outside. You can put any used sparklers inside to prevent any residual fires.

NECESSITIES:
-Morning Glory Sparklers
-Large lighter
-Tripod {or sturdy surface}
-DSLR camera
-Dark clothing
-Patience

PROCESS:
-Using our DSLR camera, we shot all of our photos in manual mode. {I have a Nikon D5000.} I liked Nicole's post for technical information, though I used a different shutter speed method.
-You can gain more control with your shutter by setting your camera to "bulb" mode. It allows you to press down to "start" the photo and let up to "finish" it. This sounds really unscientific, but I promise it gives you the most control of your sparkler writing. {cv} would press down on the shutter button, say "go", then I would start writing. When I would finish the letter, he'd let up on the shutter button. We could often get multiple letters done with one lit sparkler.
-It goes without saying that you can include multiple people in the letter drawing process for a fun group photo.
-Many tutorials mention the difficulty of writing backwards. I have to give {cv} credit here: he realized it would be so much easier to write as if you were doing so on paper. {aka the normal way}. By flipping the photo, the word {or letter} appears correctly on your screen. If you don't have photo editing software on your computer, don't worry. After a quick trial, this website seems to work--just choose the left-right option. {If you have a smart phone, the Afterlight app will also allow you to flip the photo after you send it to yourself via email.}
-Have some patience: some letters are definitely harder than others. I struggled with J, R, and Y especially. Even though they seem easy, they tripped me up! 

This may seem like an intense process, but I can assure you that your first attempt at sparkler writing will be the toughest. We were able to take the photos for this post rather quickly, compared to our baby announcement photo shoot. As a point of reference, this post included 26 letters and a heart and the announcement had only three letters. It does get easier!

Apologies for the novel of a post, but I wanted to arm you with everything you need to take great sparkler photos this 4th of July--and beyond. If you've tried to take sparkler photos and have any tips, please feel free to add them below. Every little tip counts! Happy almost July 4th! xoxo {av}

ikea hack: malm dressing table.

easy + affordable ikea hack: malm dressing table.

Six months ago, I assembled this IKEA MALM Dressing Table to use in our master bedroom as a glorified TV stand. The size and height worked beautifully with our space, but I didn't anticipate the eyesore in created: a mass of crazy cords from our TV, cable box, and wireless router. After staring at these cords every morning, I decided to take matters into my own hands. I needed an easy {and affordable} solution stat.

easy + affordable ikea hack: malm dressing table -- how to hide the cords for good!

Since we aren't going to be in this apartment forever, I didn't want to spend much money on the solution. The dressing table itself cost $149, so I ideally wanted to round out the project for under $200. I realized the best method to cover this mess would be some sort of curtain. Since curtains don't really come in that size, I knew I would have to make my own. 

To hold the curtain, I found a white tension shower curtain rod at Bed Bath & Beyond for $11.99. I used a 20% off coupon, so I took it home for only $9.59. For the curtain itself, I wanted to use a few yards of the Pottery Barn linen fabric to match our headboard. However, our budget got the best of me. At $40 per yard, I knew it wasn't worth the price for a nine-month solution. I stumbled upon NY Fabric Center online and found a nice linen for half the cost: $18.49 per yard. I was even able to score a free shipping coupon via RetailMeNot.com, so my grand total for the fabric was $36.98. {Note: I'm sure you could find some other fabric to your liking at your local fabric store; I just made a quick decision late one night and went with this!}

Below,  you can find a little play-by-play of how I made this hack happen--pin it for later or download a PDF for easy reference by clicking here!
ten steps to tackle the ikea malm dressing table hack + how to get rid of the cords for good! {free printable included!}

The total cost of this project came to $195.57 {$149 for the table + $9.59 for the rod + $35.98 for the linen}. As for a time investment, I would estimate at least 60 to 90 minutes for the assembly of the table itself {more if you're not familiar with IKEA products}. The sewing of the curtain should take less than 30 minutes. I'll admit that it had been a little while since I used my sewing machine, so it took me a bit longer than I had hoped. All tolled, I was at my sewing machine for 60 minutes.

I apologize for the long post, but it was necessary to include all the details. Coming in under $200 with relatively little headache, I'd say this was a win for me. {cv} even agreed ;) Have you found any other fun hacks {that worked} across the interwebs lately? Please share! xoxo {av}

last minute valentine's day ideas.

easy last-minute valentine ideas!
Whether you're celebrating Valentine's Day or not this year, you have to admit its cheery colors are essential for surviving this dreary winter! These seven ideas will solve your last-minute woes: whip up any of the bunch and your valentine will be singing your praises to the moon and back...

1) Crunchy Creamy Sweet: This Valentine's Day Bark is the perfect treat: colorful, yummy, and easy to share. If you make a large batch, you can still save some for yourself!
2) Real Simple: Use an old matchbook to create this clever little card. Make it extra special by using a matchbook from your favorite restaurant!
3) Martha Stewart Weddings: As a map lover, this simple DIY stood out from the pack. Print a map to place on the existing mat in a frame and share one of your favorite places with your valentine and/or best friend. {If time permits, you could even buy a vintage map on eBay or elsewhere on the interwebs!}
4) Style Me Pretty: Though the Style Me Pretty team is spot-on with their suggestion to make these for your bridesmaids, these glitter tote bags serve so many other needs. Whip together one of these glittery concoctions for a quick gift or use it to transport your goodies--and conveniently leave it behind as a gift. Sneaky sneaky...
5) The Novice Chef: The first moment I saw these marbled red velvet cheesecake brownies, I knew it was love. The rich red color is perfect for Valentine's Day--or any day really ;)
6) Young House Love: Displaying keys can be a poignant, everyday reminder of how much your love has endured. As a long distance survivor, I think this little DIY is extra meaningful.
7) Paper & Stitch: Long after Valentine's Day is over, you can still create your own mylar goodie bags. Until then, whip up these shiny bags to serve your tasty treats in style!

Still stumped on what to make for your sweetheart {or your best friend!} this Valentine's Day? There are plenty of other ideas my future diy + sweet tooth boards on Pinterest. If you want to send your love on paper, you better get a move on. Though my preference is always snail mail, I think Paperless Post is the best for virtual valentines! What other treats do you have up your sleeve for Valentine's Day this year? xoxo {av}

cute as a button.

For as long as I can remember, I've loved buttons. I sought out every button I could find as a kid. I even made my parents stop at estate sales to find big piles of them. {Don't I sound like the coolest kid ever? Holy moly!} When my grandmother and great-grandmother passed in the mid 1990s, I inherited a few gorgeous boxes of buttons which I've held onto for years. And now, thanks to pinterest, I have plenty of ideas about what I can do with those special buttons--and all the others I collected!


{button projects: 1 - 2 - 3 - 4 - 5 - 6 - 7}

What did you collect when you were younger?

Have a fantastic Thursday! I'll see you back here tomorrow for Friday's Fancies! I can't wait :)
Don't forget to get all your entries in for the bfrend giveaway--it ends Sunday!
xoxo {av}

a little surprise.

Last June, I was honored to stand beside one of my best friends, {eh}, as she became {eb}. 
{I posted a little more of her wedding lead-up back in February...check it out here!}
Amidst all the wedding craziness, I snapped a few photos with my Instax camera that 
I had actually purchased to use for the guestbook at our own wedding in April 2010.

As a fun little gift, I decided to assemble those Instax photos into a little makeshift album since 
there aren't any ready-made albums for photos that size. This may seem like a rudimentary craft, 
but let's be honest: when was the last time you spent much time thinking about photo corners
I had kind of forgotten about them--I'll admit. When trying to troubleshoot this lack of album
situation, I beelined for my local Michael's and created my own solution with those little 
sticky things that slipped my mind...


The ingredients for a simple and clean album
kraft paper photo corners from Michael's - $3.99
8" X 8" scrapbook from Michael's - $14.99
TOTAL = $18.98 (plus tax)

Even if you don't have an Instax, this little handmade album might just be the perfect gift. 
Photo corners give off a kind of retro vibe to me...and I just love them. As a tip, be sure to
load up all the photo corners first (as seen in step 2) before flipping it over to stick onto the
page. It worked a lot easier that way!

Do you have any easy, go-to crafts which aim to please?

I'm aching to get my hands on some fun DIY projects...so please pass on a few
of your favorites :) Hope your Wednesday goes by quickly! xoxo {av}

{crafty} cinco de mayo.

{via}
Feliz Cinco de Mayo! Though I have no Mexican roots, I wanted to take part in the cornflake dreams Let's Fiesta blog crawl! I have always admired the bright and bold colors associated with Cinco de Mayo. I first fell in love with those colors through the beautiful banners my freshman year roommate, {si}, brought from California to hang in our room. I tried hard to find a picture of them hanging in our room--but only found blurry ones, so I decided the best way to remedy the situation was to make my own! 
So, without further ado, here is my attempt at making my own papel picado...

Now, I must admit, the final product looks a little more elementary then I hoped...but I have dreams of creating better ones in the future...for celebrations other than Cinco de Mayo, perhaps?! Make sure to hop over to cornflake dreams and see the other lovely Cinco de Mayo fiestas across the blogosphere! 

If you decide to celebrate tonight, have fun! Even if you don't, have a very happy Thursday! xoxo {av}

P.S. Don't forget! Tomorrow = Friday, which also means Friday's Fancies! After the phenomenal turnout last week, I cannot WAIT 
to see who decides to join in the fun tomorrow :) If you have any questions, please email me or check out this handy post!!

a berry fun time.

As promised, here's another installment in party planning from little ol' me...
this time for a bridal shower one of my best friends from home, {eb}!
{I was beyond honored to be a bridesmaid in her beautiful June 2010 wedding!}

bride-to-be {eb} with her bouquet of peonies!

Her bachelorette was in Chicago this past May--about 1000 miles from my home in Providence. Since I love to party plan, I volunteered my services to the maid of honor, {hp}, also one of my best friends from home...

moh extraordinaire {hp} + {av}
I stuffed my suitcase to the literal BRIM with goodies...not knowing exactly what the space looked like, I just took a little inspiration from the bride-to-be's new last name, Berry. I went with vintage heart theme {appropriate yet somewhat cliche, I know}. 
Everything but the flowers had to fit in my suitcase, 
so this is what came out of my magic bag!

A banner...
photo from {ek}
Though this wasn't the ideal wall on which to hang it, I made this banner using black cardstock {by first drawing the letter in pencil} and then cutting it...pretty simple! I was hoping for one big blank wall, but it contained a HUGE piece of art...so it was a no-go. sad face. If you can't read it, it says: "we <3 erika berry much"

As a sidenote, I used twine as the base for my banner and I found the mini-laundry clips at Michael's for next to nothing--they're great to reuse in the future too!

The table + chairs...
photo from {hp}

I brought the coke bottle {vases} from Rhode Island, which coincidentally were from the 2010 Final Four...featuring the Butler Bulldogs {the alma mater of more than half the guests!}. Though I wanted vintage bottles, I didn't want to worry about them breaking in flight or having to lug them back. Instead, I just distributed these among the bride + bridesmaids.

We found the peonies {with flecks of red} and the hypernicum {aka berry-looking flowers} at the Whole Foods on our walk to the restaurant. We thought about paying someone to do the flowers, but with a few summers in a floral shop under my belt, I figured I could save a few pennies by doing them at the restaurant...with scissors from my magic bag.

I used the twine to put one of those funny wooden hearts 
{which cost all of 50 cents a piece at Michael's!} on each chair. 
Those magic bag scissors definitely came in handy again!

The placecards...
photo from {ek}
I made all the placecards in Rhode Island, using shipping tags I found at Staples.

hipstamatic print by {av}

I used a small set of alphabet stamps that I found at Michael's {in the $12 range, but good for many future projects!} to create each placecard. I then used a heart hole punch I had around the apartment to add an extra ounce of flair. 

photo by {av}
Before finding the hypernicum berries, I was content to have just the heart cookie cutter {found via Oriental Trading Company...an inexpensive option since it was more for looks than utility} and the shipping tag...but the berries were like the cherry on top ;) I added the two red dots with a pen to tie the red in from the hearts elsewhere in the room.

photo from {hp}
{Here's the whole gang enjoying {eb}'s bridal brunch at La Madia in Chicago...
you should have seen {hp} and I running around the hour before they all arrived. 
We made it happen, that's for sure ;) With a week or so lead time,
I was really happy with how it all turned out!}

 All in all, the magic suitcase went back to Rhode Island a little lighter, 
but my heart was definitely much fuller! 
There's nothing I love more than making the people I love smile.

What did you think of my first attempt?! Have you ever helped to plan a more 
formal girls' get-together like this? What did you do to make it special?

Apologies again for my lack of blog chatter...work, class, and life have been getting in the way! Don't worry...I'll be back at it soon! As always, thank you so much for your blog love. You know how to make a girl feel wanted ;)

Can't wait to hear your thoughts! 
Have a great Wednesday! xoxo {av}

my postal love affair.

In Sunday's post, I promised to share more about the evolution of our wedding. This post seemed appropriate because during these weeks last February, I was slaving away on our invitations...which would each eventually hold one of each of these seven different stamps!

photo by {av}
I know what you're thinking...
a) WHAT?!
b) are you crazy?
c) why??

With our long engagement, we didn't begin the discussions around "paper" until early August 2009 for our wedding in April 2010. Thankfully, we chose very capable hands to handle our invites...those of Rhode Island's own, Paper Moss. {And the bonus? The owner and creative genius behind Paper Moss is one of my closest friends here in RI!}

I don't know where in the wedding blog world I first spotted the multiple-stamp envelope. I only knew from the minute I saw it that I. had. to. have. it. From the blogs, I noticed most people chose a color of stamps to pursue. I decided to take a different...and a much more colorful route.

The final products looked a little like this...

photo by {av}

Each stamp represented something different for us as a couple...
Lighthouse stamp = Maine Statehood stamp...{cv} spent his childhood in Maine
George Washington + Flag stamps = with our rich history in DC, along with actually having the wedding there, it was only appropriate to have a few of these included
Indiana stamp = Indiana statehood stamp, aka my home state stamp
Dolley Madison stamp = the former First Lady escaped to the Dumbarton House, where we got married, during the war of 1812
LOVE stamp = no, we don't have a connection to Philly...the artist, Robert Indiana, also hails from my home state

I must admit that the final product made me so happy...it was the first real tangible item {other than our save-the-date} that our guests would receive and I really wanted to set the tone for our big day. I had to glue each stamp on individually, so they wouldn't fall off in the mail...and thus not make it to their recipients. By the numbers, I sent a few more than a 100 invitations...which means I glued more than 700 stamps. OY! Each envelope took a lot of TLC, but in the end, it was absolutely worth it.

One surprise on the wedding day? Our wedding cake! 
I left it in the capable hands of my wonderful planners...little did I know my new stamp obsession would carry through to our key-lime+blueberry cake heaven.

photo from a family friend
A few words of advice...
-make sure you weigh your invitation with EVERYTHING in it, including any sort of ribbon or ties around the invitation suite. You need to know how much postage is needed before you spend $$$ to find the stamps. {Since you'll probably be planning for postage before you receive your suite, ask if your invite designer can create a mock set for you.}
-it takes time {and a considerable amount of it} to track down the stamps...so start planning what stamps you might want. I found a lot more success in finding the stamp sheets I wanted after I identified the "scott" number. Once I had that, it made eBay much less daunting.
-make sure to find mint, uncancelled stamps...if they're cancelled, they're no good.

Despite the endless hours spent scouring eBay for these stamp sheets and then having to bid for them during dinners out with friends, I wouldn't change a thing. I loved having glue caked on my fingers for weeks. I just wish I could have received my own in the mail ;) 


I'm sure I don't need to remind you that tomorrow is Friday. And what does Friday bring? Friday's Fancies! YAY!  I made a new logo for you to use if you like... and I also made one in a blog button size, available over in my sidebar.

Consider Friday's Fancies to be the shopping spree like the one on this week's Bachelor. Dream big. Your goal? Pull together the outfit you'd love to be wearing during your Friday night activities--and don't worry about the pricetag! It's therapeutic {and fun!} to admire fashion without thinking about your wallet for once! {If you want to see a few other examples, click here.}


Get excited :) It's a chance to dream of being a Parisian fashionista--and to find a few new blogs to explore on your Friday afternoon! The best part? If you do a Friday's Fancies post, you get an extra entry in my Minted.com giveaway which ends this Sunday! {Make sure to add a comment to the giveaway page to make it count!}  I'll have the link-up ready to go shortly after midnight on Friday! 

If you're still reading at this point, thank you ;) I hope you all have a fantastic Friday--and liked my little postal love affair today. As always, I'm an open book...so if you have questions, feel free to comment or email me! xoxo {av}

P.S. I made a new blog button too...inspired slightly by my love of stamps. Check 'er out...

value valentines.

Last week, I picked up the February issue of Country Living...mostly because I spotted the beautiful bookshelves on the front cover. When I finally had a chance to look at it this week, I spotted a simple and an inexpensive way to make my valentines this year! 

I decided to take my own twist on this little gem...

All photos taken by {av}, except the magazine cover--found via Country Living


What you need: paint strips, glue, glitter, + a metallic pen {plus optional hole punch}


Before you get started: use a solid-colored paint strip to punch a few hearts + locks to use {if you choose to purchase the punch}


Step-by-Step Instructions {after trial and error with the pen + the glitter}:
1) Using the glue, create an "O" in the second square and make sure it isn't too raised with the tip of the glue bottle
2) Sprinkle the glitter on the glue "O" with a piece of paper underneath - repeat until fully covered
3) Take the metallic pen and write one half of an "X" in the first square and a full "X" in the third square
4) Glue the key as the other half of the "X" in the first square and use the heart as an "O" in the fourth square**
5) {not shown} Fill in the remaining squares with a short and sweet message
**Should you not purchase the whole punch {which is certainly ok!}, you can use a different color pen to draw the key or the heart


Though I felt a bit scandalous picking up paint strips {without an intent to buy} at Home Depot and Benjamin Moore, I couldn't be more happy with the end result!
After trying out a number of different types of paint strips, I found that the ones from Benjamin Moore worked quite well. The one I used even had a color called "yours truly"! {It was Strip #009 - with colors 1317 through 1323.} 
The cost on this value valentine is minimal, considering you may already have glue and glitter in your craft goodies. I did buy the Martha Stewart Heart + Lock punch at Michael's. Though it had a $12.99 pricetag, Martha's tools were on 25% off this week--so it came home with me for $9.75! {I'm planning to use it for future bachelorette parties and bridal showers for my yet-to-be-married friends.}

As a sidenote, a BIG hooray {and a BIG thank you!} to Jillian, Ashley, Ashley AnnAna, and Kells who joined me for this week's Friday's Fancies...I'm so happy they did! I'd love to have more of you join in next week :) Thank you all for all your sweet comments too! It means the world to me that you take time out of your days to stop by {long distance loving}.

I hope you all had a great Saturday--and enjoyed this little value valentine! 
More tomorrow! xoxo {av}

p.s. I made this.

Last week, I was treated to a lovely little Christmas surprise from my maid of honor, {ch}. I get a boatload of packages for work...so, when I first received the brown padded envelope, I just added it to my work pile. A few hours of organizing later, I saw her name in the corner of the package and I obviously ripped it open!

Inside I found this absolute gem of a book she and I had seen 
during our kate spade adventure the weekend before

P.S. - I made this... by Erica Domesek
Hipstamatic Print by {av}
I loved the style of this book when I first saw it with {ch}...it has easy-to-digest craft projects with lots of fun flair. Some of it is my style, some of it isn't--but I love how Erica Domesek explains them with fabulous pictures and witty captions.

I haven't made anything out of the book yet--but you better believe I will be once the craziness of the holidays cools down. Here's a little video clip of the author with everyone's favorite crafter, Martha:


The author even shares an inspiration board behind each project, which I thought was pretty neat! Here's an example from the "big ball necklace" project she did on Martha's show:
Hipstamatic Print by {av}
Once I get through a few projects, I'll be sure to share the results. If you ever need a last minute gift for a crafty friend or DIY-er, P.S. - I made this... is sure to be a winner. Or--better yet--grab yourself the book and make a few gifts of your own! Do you have any other go-to gifts for your crafty friends? Even though the holidays have passed, it's always good to have some ideas on the back burner for birthdays!


Thanks again to {ch} for the fabulous and thoughtful gift :) 
Have a great night! xoxo {av}