Showing posts with label technology. Show all posts

how to build better pinterest boards (and why you should).

how to build better pinterest boards (and why you should!)

I remember my first introduction to Pinterest in early 2011. A new blogging friend told me about it over lunch and she offered to invite me. I joined and immediately fell in love. The concept was novel: one place to keep all your inspiration online. In the ensuing years, Pinterest has grown to be so much more than just a place to pine over pretty homes or get hungry from scrolling through recipes. It is a serious traffic generator for blogs, brands, and businesses. If you're a blogger, you know how important it is to have a strong presence on Pinterest, both with the content you create and the content you're sharing.

While I don't have a million followers, I have invested a great deal of time and energy in curating my Pinterest boards over the years. However, it wasn't until recently that I decided to put thought behind my board descriptions. Why? I always thought my board names did enough. However, I realized that the method behind my madness may not always be as apparent for others as it is for me. 

I did some research to support this effort. Board descriptions can be captured by search engines, which means you could be attracting a wider audience with a few simple keywords. With the more advanced search features now available on Pinterest, they tell us that solid board descriptions will also help when someone searches within the site. If you're into SEO (aka search engine optimization), your SEO efforts shouldn't end on your blog -- they should extend to your pins and board descriptions as well.

Should you want to make your profile more search engine friendly, click on the gear in the upper right hand corner of your Pinterest profile. You'll see the option to Edit Settings. Click through there and you should see the Search Privacy option. You will want to make sure your settings are open to search engines. If you want your profile to be open, it should look like the image below.
I invested a good hour in crafting descriptions for my 44 (current) boards on Pinterest. I focused on giving a light-hearted but informative description for someone who may be newly discovering my account. I kept with the style of writing I use throughout all of my pins. My hope is that these descriptions will illustrate the thought and effort I put into my boards.

Last but certainly not least, I made it my mission to make sure all of my pins are properly sourced. I wanted to ensure that my followers know they can pin from my boards with confidence. I included the simple line: (all images linked to original source) It may not seem like much, but I can hopefully continue to spread the message that proper sourcing is absolutely essential within a social media machine like Pinterest.

While Pinterest analytics tell us a great deal, they may not tell us what searches bring us to our profiles. Even still, I think it is worth the effort to invest the time in your Pinterest profile. In doing so, you will build better boards -- and will hopefully attract more followers as a result. I know I appreciate other pinners who are intentional about their boards, so I imagine others do too. Thanks for indulging me in this geeky post -- and I hope it inspires you to spend a random hour (while watching mindless TV, perhaps?) updating your boards to make them the best on the block! I'd be happy to answer any questions in the comments section :) xoxo {av}

If you want more posts on Pinterest by yours truly, here are a few favorites:


instagram etiquette: why it matters + why you should care.

instagram etiquette: why it matters and why you should care.

When I joined Instagram three years ago, it was little more than an auxiliary social media platform. I posted haphazard photos of everyday life and didn't overanalyze things. I don't know exactly when it changed, but somewhere along the way, Instagram became so much more. From photo editing apps like VSCO CAM to shopping platforms like LIKEtoKNOW:it, there are countless ways to make your snapshots more than just a photo. 

Far and away, Instagram is my favorite social media platform. I have always loved photography, so my favoritism should come as no surprise. In the midst of my love and affection for Instagram, there is also a bit of frustration. The seven points below encompass my view on Insta-etiquette in a nutshell:

1) IF YOU'RE GOING TO SHARE, USE PROPER SOURCING: If my most viewed {and pinned} post of all time is any indication, I am a sourcing fanatic. I won't pin a photo until I can find the link to the person, blog or brand who created the content. As a blogger, I know just how long it takes to craft new posts. Though I don't share "inspirational" photos from others on my Instagram feed, it makes my blood boil to see the hard work of my fellow creatives uncredited and unattributed on Instagram. Applying a new filter and adding some text below the image does not make it yours. Do your due diligence and find the source before you're tempted to share someone else's content. I have heard countless stories about missed attribution and have experienced it myself. While you may be inspired by someone else, prettying up your own feed with their work isn't the best tactic. If you do share someone else's work, always {and I mean always} tag them in the initial photo description. Otherwise, the quick passerby of your feed will miss the attribution completely. My personal opinion is that you shouldn't share the work of others, but I know I could be alone on this one.

2) DON'T PROFIT FROM OTHERS' HARD WORK: On the subject of sharing others' work, don't take someone else's image and make it shoppable. It may be a "smart" business move for a blogger, but you shouldn't be profiting from someone else's outfit or living room. Forever and ever, amen.

3) STOP SHARING FOR THE SAKE OF SHARING: In the past, I used to beat myself up for not sharing new content on my Instagram feed daily. These days, I don't give myself the guilt trip. You may read things about how sharing regularly is the best way to gain followers. I can't argue with those articles: when I'm posting more frequently, I do see my followers increase. When I mention "sharing for the sake of sharing", I mean the posts where you toss something up there just to say you Instagrammed that day. Chances are that if you don't like what you're posting...others won't either. Blowing up someone's feed with mundane things is just that: mundane. Allow yourself a pass. Instagram isn't going anywhere. 

4) DON'T OVER-GRAM: In a similar vein to #3, there are few days in life which require more than three or four Instagrams. Back in the good ol' days, I didn't pay attention to the number of snaps I shared. Fast forward to present day: I rarely share more than two Instagrams in a 24-hour period. On vacation or for a big life event, I may share three or four photos in a day, but it is incredibly uncommon. This is just one example, but follow me here: unless you work in the food industry {or have a food-oriented Instagram account}, no one needs to see all six courses of your dinner. I rest my case.

5) BE ORIGINAL: Peony season inevitably brings an onslaught of peony posts. If you're going to share these beautiful blooms, find some way to make yours different and stand out from the crowd. This concept applies to all of your Instagrams: don't knowingly re-create an Instagram you saw elsewhere. It is just the same as re-gramming someone else's work without attribution. Ick.

6) LEAVE GENUINE COMMENTS: Commenting is a fabulous way to join the "conversation" on Instagram. However, if you don't have something nice to say, leave it to yourself. Leaving a comment on Instagram is so much easier than leaving one on a blog. Quipping something rude and inappropriate may seem funny, but it can be incredibly hurtful. While bloggers are used to putting themselves out there, it doesn't mean that Instagram is the forum in which to criticize them. I may be on my own island here, but I don't think I am: keep your negativity to yourself. Nobody wants it.  

7) STAY TRUE TO YOU: My favorite Instagrams are often the ones which receive the fewest likes. This used to confuse me, but now I understand. Be it the subject or the timing, certain Instagrams will always perform better. {Think about yourself as a potential follower of your feed; it should all make sense.} When I look back on my feed in a few years, I will be glad to have those low-performing photos in it. In the end, all that matters is that your Instagram feed reflects you. Goodness knows, my Instagram feed isn't the most popular. {I gave up caring about the number of followers and likes long ago.} I share what makes my heart happy and this has made all the difference for me.

What would you add to the Instagram etiquette conversation? I share these seven pointers because I would genuinely like to make Instagram better -- not because I'm better than anyone else. Instagram etiquette matters because social media is, by definition, a public platform. We owe it to one another to  be supportive and encouraging, rather than catty and calculated. Agreed? xoxo {av}

P.S. The lucky winner of my $100 Rent The Runway giveaway is Anne from In Residence! Many thanks to all who entered :)

best google fonts for blogs.

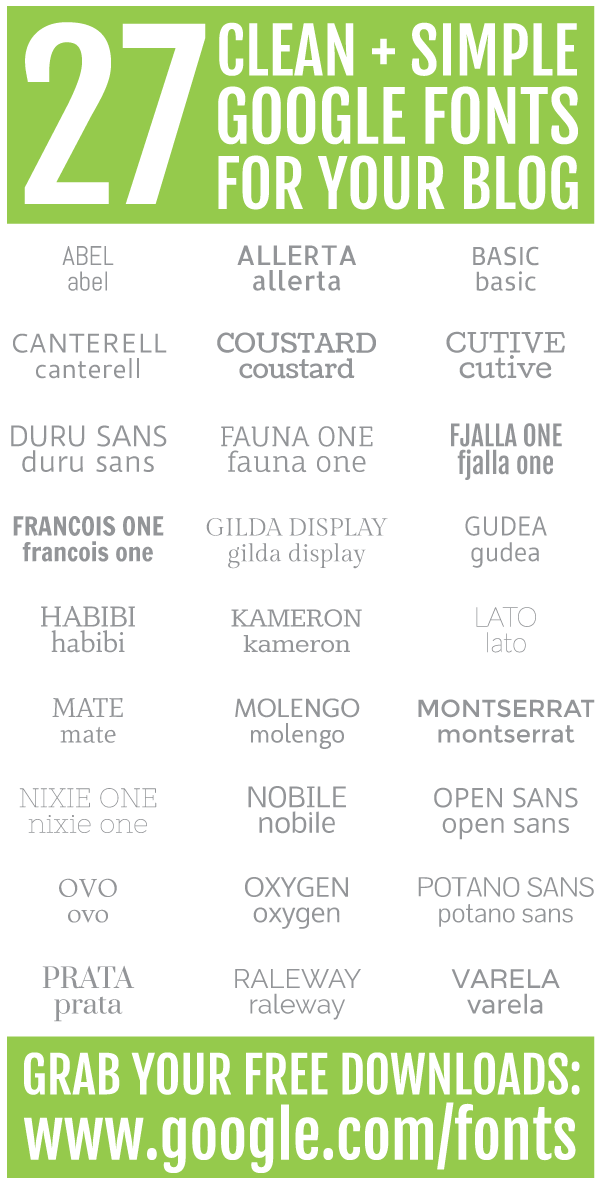
27 clean + simple google fonts for your blog (for free!)
Two weeks ago, I encountered some slow load time in my web browser and was tired of waiting for it to load. I decided to restart my MacBook Pro in the hopes it might bring it back up to speed. Little did I know, shutting down my laptop signaled the death of a certain sector of my hard drive {or so they told me at the Apple Store}. Thankfully, I had purchased AppleCare with my computer and I was still under warranty, so I managed to squeak by unscathed financially. However, my font book did not. 

Low and behold, I was able to recover all of my files {music, photos, design projects, etc.} in safe mode while making myself at home at the Apple Genius Bar. In the hurry to make sure I transferred over the important stuff, I didn't transfer the extensive collection of fonts. It didn't hit me until I opened up a project from my hard drive to discover that all of the fonts I downloaded over the past three years were gone.

At first, I was heartbroken. I am a self-professed font geek, so I didn't take this loss lightly. After a few hours, I had a lightbulb moment: it was time to start new. A font I loved when I first started my blog in 2010 {i.e. Caviar Dreams} was no longer on my top ten list. It was time to start with a blank slate and build a repertoire of new favorites. I started my search using Google Fonts.

I scrolled through all 600+ Google Fonts to download a few which caught my eye. The 27 fonts you see above passed my test, though I haven't had a chance to try them all out extensively. I think it is important to visualize the font in both upper and lower cases, so I gave examples of both. Sometimes, I use a font purely in all caps because I like it better. I'm funny like that ;) Feel free to download a few and see if they suit your fancy!

Do you have any favorite fonts? Have you noticed that your taste in fonts changes too? Thank you for indulging me in a geeky post. The long and short is to always buy AppleCare--and be willing to roll with the punches of a cleared hard drive. In the end, it was refreshing to rebuild my font book, even if it was initially jarring. xoxo {av}

P.S. To download a font file using Google Fonts, simply click "add to collection". A box will appear at the bottom of your screen, on which you'll then press "use". You'll be taken to a new screen and should see a downward-pointing arrow on the right side of the screen {just above something which looks like a speedometer}. Click to download the font as a .zip file. Once downloaded, click on the font in your downloads folder {or wherever you saved it}. Simply follow the prompts to add it to your font book--and always adhere to the font licensing! {NOTE: this is how it works for a Mac; here is a tutorial for a PC.}

how to choose your facebook cover photo.

how to choose the right facebook cover photo for your blog or business.

Happy Monday! Since I'm a serious nerd, I conducted a little experiment over the weekend on Facebook and learned a thing or two about cover photos in the process. To save you the time {and advertising dollars!}, I wanted to share my takeaways from my two-day ad campaign. I was super curious to see what photos engaged the most people and drew enough intrigue for someone to click over to my blog's Facebook page.

I chose four rather different images: a sailboat, macarons, hydrangeas, and a scene from Cape Cod. Each of these four things are close to my heart, thus I would hope to find readers who enjoyed the same things. {Note: I'm not a sailor, but I do love boats.} It may just be super dreamy, but the photo from the sailboat outperformed all three of the other images by nearly 400%. After that overwhelming vote of confidence, I changed the cover photo of my Facebook page to the sailboat scene this morning.

Facebook cover photos have always intrigued me, mostly because it is just another thing to "get right" in the game of attracting new readers or fans. The image you feature needs to grab their attention without going over the top. Here are four things I considered as I chose the images for the ad run, which ultimately translated into my new cover photo:

1) If at all possible, use your own photo or graphic. By using someone else's photo, you're not showing off your work. Sure, someone else's image may be pretty, but giving proper credit on Facebook isn't the easiest thing to do. It also allows for someone to snipe the image and use it for their page, thus causing the same problem that happens frequently on Pinterest: lost, stolen or missing image attribution. Avoid all of that--and use one of your favorite Instagrams or snaps from a recent vacation.
2) This may seem obvious, but choose something that appeals to the type of people you'd like to reach. I would love to attract readers who have a thing for New England, hence several photos in this experiment having a northeastern pull. Ask yourself if this particular photo would make you want to click over or stay for awhile to scroll through your page.
3) Don't overdo it. A busy image with lots of text may seem appealing, but the attention span of most people is under ten seconds. You only have so long to "hook" someone. In a very literal sense, think of your cover photo as your magazine cover: would you want to pick up a magazine with a super cluttered cover? No...
4) Adhere to Facebook's sizing suggestions. I created my images in the 851 pixels wide x 315 pixels tall format. You should too! Whenever Facebook gives clear suggestions on sizing, I follow them! No one likes distorted images or text. 

What other suggestions would you have for bloggers and businesses as they create their own cover photos? What appeals to you? What turns you away? I think the best way to help one another is by sharing our own observations. Even if you're not a blogger, I still think these suggestions can apply to your own cover page. Last but not least: if you're here as a result of my "experiment" this weekend, I'm glad to have you! Thank you for the insight into making my little corner of the internet better. I hope this helps beautify and boost your own Facebook page in the process! xoxo {av}

how to add a pin it button.

A few months ago, I decided it was finally time to install a "pin it" button on my blog. I searched and searched for tutorials until I found one which wasn't crazy programmer jargon. I know a bit more about HTML from my days as a 16-year-old computer geek than the average person, but I promise this isn't a difficult tutorial. BloggerSentral made it as simple as possible--click here to see more! {Note: BloggerSentral gives instructions for Blogger and Wordpress--my post just centers around Blogger!}


A few words for the wise:
-Make sure you've BACKED up your blog before you make any changes. You can do that easily in the "Template" tab {the same place you'll be making the changes in your HTML}. It is in the upper right corner of your screen, below the Google + icon.

-When you're ready to add the <script>, click within the HTML window and then press control F {or command F} to find the </body> tag in the HTML. The placement of the <script> is most important!

-If you want to prevent something on your blog from being pinned after you install this button, you'll need to click over to the HTML tab in your blog post. Don't get scared by the HTML! Scroll down until you find the <img> tag which you want to "hide" from this widget. {For those new to HTML, you can just look for text which you know is around the picture to identify it. Simply add this text before the start of the <img> tag: <div class="nopin"> and then add this after the <img> tag is complete: </div>. It will look a little something like this: <div class="nopin"><img src="long random url"></div>

CLICK HERE FOR THE FULL CODE--these partial snippets won't do you any good! If for some reason you input the code from this source and it doesn't work, try copying and pasting from here, here or here. I'm not sure of the rhyme or reason behind it, but sometimes, one site works over another. I wish I was a big enough coder to tell you why!

If you wanted to add the pin it button I have on my blog, you're more than welcome :) All I'd ask is for you to give a quick shout-out to this post once it's installed! Simply click here to copy and paste the image URL into the quotes within HTML here: bs_pinButtonURL = "PLACE URL HERE".

Was this helpful? What other little tutorials would you want me to tackle?
This is pretty high on the geek scale, but I hope it's helpful. I know many of you have the button installed, but for those of you who don't, this tutorial was the easiest one I found. I can tell you that I've had many more pins off of my blog since I installed my pin it button. It works, people! I'm not the queen of coding, but I can certainly try to answer your questions! If you have any other questions, you can email me one off. xoxo {av}

P to the S: After completing this post, I noticed my pin it button wasn't working. {Fancy that!} I had to re-install it, which was a great test in preparation for this blog post. My learning?! Having the "pin it" button readily available is absolutely essential to getting traffic from Pinterest. The number of pins had dropped drastically since the pin it button disappeared! If all else fails, simply copy and paste this code before your </body> tag for a simple and reliable "pin it" button: <script type="text/javascript" data-pin-hover="true" src="//assets.pinterest.com/js/pinit.js"></script>

like before you pin.

Hello again--and happy Tuesday! Some people may be tired of my Pinterest protection campaign, but it isn't ending any day soon. I view Pinterest as the ultimate inspiration central--and I don't want it to go anywhere. Last September, I shared why it was absolutely vital to clean up our Pinterest boards. In the months since that post, I have been constantly seeking a way to better manage my boards on a daily basis. I decided the "like" feature of Pinterest was my best option to capture things I liked {literally}. Many people forget about the power of the "like", so read on to see how it could help you get the most out of Pinterest!


There was a great deal of discussion about the "like" feature in one of the sessions I attended at Blog Better Boston this weekend, led Isra of The Frugalette. She and I both agreed that liking is the only thing we do when using Pinterest on our phones. It's an easy way to bookmark the things which catch your eye on the go--without committing to pinning. When pinning on the go, you risk your pin leading to a random tumblr or another blog, which wasn't the actual source of the image.

As it stands today, I have a whopping 453 likes. From time to time, I take a few minutes to pare them down, but I don't sweat that number. When I have the time to ensure these likes have proper sourcing behind them, I will actually repin them. If the source isn't correct, I do everything I can to find its origin. If I can't find it using this bookmarklet, I unlike it immediately. Though it doesn't give that instant satisfaction, it does eliminate spreading around a pin which isn't sourced correctly. It is a simple way to keep Pinterest "honest", which is everyone's best interest. 

Do you use the "like" feature on Pinterest? If so, how? I am so curious to see what you're doing! xoxo {av}

STAY IN TOUCH: BLOGLOVIN + INSTAGRAM + TWITTER + PINTEREST + FACEBOOK

free summer inspired iphone background.

A very happy Thursday! I'm excited to share a new summery iPhone background today :) When I spied this mint gimlet over on The Life Styled, summer felt just a bit closer. The fresh limes and gorgeous striped tablecloth stir up summer memories. 
{photo source: mint gimlet via The Life Styled}


You should be able to download the appropriate background on your computer and then email it to yourself. Once you do that, save it to your computer and apply it as a background--and you'll be in business!
If you have any issues, please let me know :)

What other color schemes would you like to see in an iPhone background? xoxo {av}

STAY IN TOUCH: BLOGLOVIN + INSTAGRAM + TWITTER + PINTEREST + FACEBOOK

pinterest analytics.

If you're a blogger or website owner, you will be very happy to know that Pinterest has finally created a way to analyze how people are pinning from your site. As a serious nerd, I'm here today to help you sort through Pinterest Analytics. The time you invest in understanding what content is resonating with your visitors will pay dividends down the road, so let's get this party started...


Here is the all-important first step:


Don't know how to verify your blog? Blogger bloggers can check out this post from yours truly and WordPress posters can click here for more info. I have helped a few WP bloggers add this functionality--and if you can't figure it out by uploading to your server, search for a meta tag plug-in like this one. It may take a little more effort, but I promise--these analytics are worth it!! Disclaimer: if you are just verifying your post today, you may have to wait a few days to start seeing your data.

Once you're verified:

Get ready for some crazy revelations when you click through this tab! Once you're on the landing page for your analytics, you'll see a eight different line graphs for each of the following categories:


The site metrics homepage is great, but the fun doesn't end there! You can check out the most recent, repinned, and clicked pins from your site {and how to capture this incredible data}:


I know many of you have operating knowledge of Excel, but if you want more ways on how to manage the data from your Pinterest Analytics--comment below. I might do a post on this in the future :) Being able to export the data in .csv from any page in the analytics section is such an incredible feature. You can make sense of all the data, rather than getting overwhelmed by all the scrolling.

Extra info: I noticed that the data doesn't extend back any earlier than the first days of February. Pinterest says they have data as far back as November 2012, but I just didn't see it. {I'm not sure if this is because they just started the service or if they don't intend to keep this historical data.} As the data pool grows, I'm sure we'll be able to figure out that conundrum. Additionally, some of the data didn't match up with Google Analytics. {Clicks may be counted differently than visits in GA.} In the coming weeks and months, we'll learn how to better understand these discrepancies. I just wanted you to know my first impressions.

I apologize for the length of this post, but there was a lot of nerdiness to include. If you didn't know I was a geek before, you certainly know now after reading this post. Should you have any additional questions or findings, please please please share them in the comments below. I want this post to help us all learn how to effectively navigate the waters of Pinterest Analytics!

I can't wait to see you all back here tomorrow for a St. Patrick's Day round of Friday's Fancies.
{Don't forget: all fashion posts are welcome!} Have a great Thursday! xoxo {av}

STAY IN TOUCH: INSTAGRAM + TWITTER + PINTEREST + FACEBOOK + BLOGLOVIN
P.S. Want the official background info from Pinterest? Click here to see the Pinterest help page!

lucky.

Back in November, I preemptively shared a holiday iPhone background. It was a little early, but this time around, I don't think I'm overshooting. With Valentine's Day behind us, a springy iPhone wallpaper is in order. It may be my ever-present desire for warmer weather, but whatever it is, a dose of green won't hurt anyone. Here's a "lucky" iPhone background which is perfect for the lead-up to March 17th...

{iPhone 5 version}


{iPhone 4/4S version}


Not sure how to install it? Here's the skinny...


You can strategically place your apps so that the lucky clover shows in the right hand corner. Tricky, right? If you use the background, tag it on twitter or instagram with the #ahappyiphone hashtag! xoxo {av}

STAY IN TOUCH: INSTAGRAM + TWITTER + PINTEREST + FACEBOOK

how to verify your blog on pinterest.

Back when Pinterest introduced website verification in October, I didn't think much of it. Every so often, I would stumble on someone's Pinterest page with the pretty checkmark next to their URL. I decided this week that I wanted it too. I thought the process would be much harder, but truly, it was easy as pie. 


Though HTML can be a little confusing, I hope this little guide will keep it simple. 
I'm sure there may be other ways to do it, but this method worked for me.


YAY! I hope this helps :) If you have any other tips and tricks, be sure to leave them below. Since I'm not on WordPress, I don't have a better handle for what their backend looks like, so I just suggest doing a little research to find out the best way. I hope this helps to make Pinterest a better place for bloggers! xoxo {av}

P.S. Here are a few other posts to help you clean up your pinboards + pin the right way!

holiday iphone backgrounds.

Ok, ok--it may be a little early, but I couldn't help myself. If there is one place I might be able to sneak in some holiday cheer before socially acceptable, it's on my iPhone. Though I haven't perfected this background art just yet, I wanted to give you a peek at my first prototypes :) Since I'm an equal opportunity iPhone lover, you can find holiday backgrounds for both the 4 and the 5...

 {iPhone 4 holiday background}

{iPhone 5 holiday background}

Wondering how to apply this background to your iPhone? Here are a few easy tips:
right click on the image + save the image to your computer
email it to an address accessible on your iPhone
open the email on your iPhone
hold your finger on the image + save it to your camera roll
open the image in your camera roll 
click to share the photo but instead choose to apply it as your home screen wallpaper
...and voilĂ ! instant holiday cheer!

If you don't have an iPhone, I promise to attempt other phone models in future posts! 
Please email me a screen shot of your home screen, share the model and I'll try my best :)
Thanks for letting me try something new today...I just hope you like it!

a case study.

Two years ago, I finally ditched my Blackberry and came over to the iPhone--and haven't looked back since. As fate would have it, my plan was up for renewal when they announced the iPhone 5 a few weeks ago. Though I didn't wait in a crazy line on Friday, I did manage to pre-order one of my own :) I finally got my shipping notice on Saturday and cannot wait to get it in my hands later this week.

The only problem? I am an absolute fanatic when it comes to my iPhone case. With very few options available so far, I decided to let you all benefit from my research. Here is my little case study:


LEFT COLUMN: Case-Mate Glam Glitter Case + Jen Ramos Colors 201 Case + Case-Mate rPet 100% Recycled Case + Kate Spade Crossword Puzzle Case  | CENTER COLUMN: OtterBox Defender Series Case + Belkin Flex Case + Belkin View Case | RIGHT COLUMN: Case-Mate Tortoiseshell Case + Case-Mate Barely There Ultrathin Case + Paperfashion Floral Print Case + J.Crew Leather Case

I haven't made up my mind just yet, but I know I have to make a decision fast! Any advice?

your advice needed.

When I got my iPhone in September 2010, I carefully placed it in one of these Speck Candyshell cases. I loved the pop of color, but I eventually went through two cases in the course of maybe six months. After hearing about the Otterbox, I was lured by the absolute indestructibility of these cases. I ran a half marathon in the rain--and my iPhone kept playing the whole race. I dropped my phone in the sink--and it survived. I'm not easy on my phone because I use it constantly, so I need a phone cover that protects without looking so, how shall we say, boring. Here are a few I rounded up--and I need your opinion...

{first row: left - right | second row: 1 - 2 - 3 - 4 - 5 | third row: left - right}

So, give it to me straight...if you've had any of the covers above:
did it do a good job of protecting your phone?
did it last longer than three months?

If you've found a cover elsewhere that works like a dream without looking like a phone from the mid-2000s, please bring me to the light ;) I need some color and personality back in my life!


P.S. See you all back here tomorrow for Friday's Fancies! I'm creating a Winter Wonderland look...don't forget that if you create a post, you get an extra entry in my giveaway for $100 to Local Hem!