Showing posts with label barton build. Show all posts

the great sconce debate.

IMAGE SOURCES: TOP ROW: LEFT / MIDDLE / RIGHT | MIDDLE ROW: LEFT / RIGHT | BOTTOM ROW: LEFT / MIDDLE / RIGHT

Hello again! This post title is a bit melodramatic, but seriously: does anyone ever feel like they have these crazy internal debates about the most non-life threatening decisions? I know I do -- and I can't blame my pregnancy hormones. I'm a perpetual second guesser. It is still a wonder to me that I was able to make so many decisions for our house build while pregnant with {jv}. It is an even bigger wonder that I still love 98.9% of the decisions I did make. (I have a few minor things here and there, which is partially the source for this post.) 

In case you were wondering, the "great sconce debate" arose recently... after one too many run-ins with the lamps under our living room windows by our crazy active 13-month-old. We have a large set of windows (two double-hung windows with a picture window in between) which basically run the length of our living room. These windows do not need window treatments (hooray!) because they face the rear of the house -- and we will never have neighbors behind us (double hooray!). I just love the natural light they bring in and how open they make the house feel. Here's a little peek at the room as it stands today:

PILLOWS: locally made at Fabric Connection with Jonathan Adler for Kravet Collections Fabric | COUCH: Pottery Barn | TOY BOX: Pottery Barn Kids | LAMPS: Pottery Barn | SAILBOAT: One Kings Lane (exact boat not available currently, but it does come up frequently!) | RUG: Dash & Albert

The layout of the room necessitates that the back of the couch is parallel to this "wall of windows". There is roughly two feet from the couch to the windows, in which we currently have two large floor lamps. I loved these floor lamps in our previous apartment. Aesthetically, they work well in our current space -- bringing out the oil rubbed bronze look on the finishings (like the knobs for our built-ins, etc.). However, they do not work functionally in the space with an on-the-go kiddo. In a post a few months back about kid-friendly living rooms, I never even thought to address lamps. I was clearly wrong. In trying to come up with creative solutions, I started searching for things like "lamps over windows", which led me to sconces.

It may be weird, but I have always hated the word sconce. I always thought they were kind of an antiquated way to light a space... until recently. I started to fall in love with the idea of a few sconces over the windows in the living room to replace the floor lamps which are like fire station poles to my toddler. The above inspiration photos are also fueling my sconce love. Even though we have recessed lighting in this living room, I love the warm light that lamps provide. I just need that warmth in a more kid-friendly way!

I'd love to hear your input -- or any other tricks you think could work -- for solving this great debate of sorts. Will sconces be too specific to fit the next homeowner's decor? (Does that even matter?) Would they still give off that warm light I'm craving on a cold winter's night? Can't wait to hear what you think! xoxo {av}

Image HTML map generator

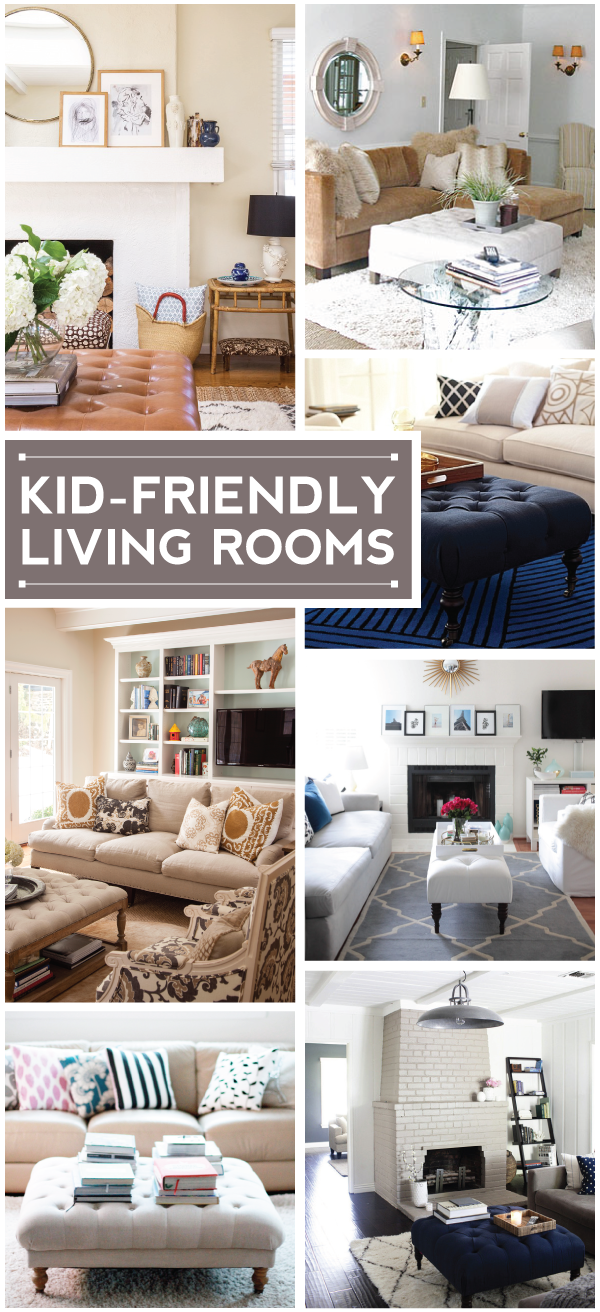
kid-friendly living rooms.


kid-friendly living rooms.
left column:  top - middle - bottom   |   right column:  top - top middle - bottom middle - bottom

When we moved in our last apartment, {cv} agreed to adding an amazing glass coffee table to the mix. My naive (and non-parent) self didn't think about the potential long-term hazards of such a heavy and rigid piece; I was just blinded by all its clear and simple beauty ;) Now that {jv} is crawling (!!!), I know it is time to finally address the elephant -- er, the glass coffee table -- in the room.

The living space in our new house is definitely open concept, so I'm running into a number of design challenges. We have a large sectional (with two equal sized arms), which I positively love. However, it raises the question about whether to find a square table or maintain the current rectangular shape. There is also a small part of me which loves the idea of a round tufted coffee table. As you can tell, my indecisiveness is out in full force. Unfortunately, I can't delay the process much longer. The little one crawling around our main level needs to stay far, far away from the rock solid edges of our current coffee table. The sooner I make a decision, the better.

After some extensive hemming and hawing, I am leaning more toward a square or round option with a little cushion. I pulled a few of my favorites here. Whenever I do these product round-ups, I do them so you can avoid the lengthy research. My pros + cons lists were to elicit your help in choosing one for our space ;)

10+ kid-friendly ottoman + coffee table options for your living room.
Dorel Living Hastings Tufted Ottoman via Wayfair: $228.99 + free shipping; 38.75" square (Pros: leather, nailhead detail // Cons: lack of options, questionable leather quality for the price)
Skyline Furniture Linen Tufted Cocktail Ottoman via Wayfair: $311.99 + free shipping; 35" square (Pros: well-reviewed, linen is a plus // Cons: feet are more detailed // Note: this is strikingly similar to the Elliot Ottoman offered by One Kings Lane in a few different colors at a slightly higher price tag of $409)
Restoration Hardware Cooper Upholstered Square Ottoman: $335 to $845 + $199 shipping; 36" square (Pros: extra simple design, available in a number of colors and fabrics // Cons: lack of storage, potentially too simple in design, high shipping cost)
Home Decorators Collection Mila Ottoman: $359 + $60 shipping; 42" in diameter (Pros: wicker look will go with any decor // Cons: cats and wicker don't always mix)
Home Decorators Collection Farrow Round Tufted Ottoman: $359 + $55 shipping; 36" in diameter (Pros: leather adds a little masculinity to the decor // Cons: smaller size, not all that elegant looking)
Seagrass Coffee Table via Wisteria: $379.99 + $125 shipping/handling; 42" square (Pros: uncomplicated and versatile // Cons: cats love seagrass...)
Ballard Designs Hayes Round Tufted Ottoman: $399 to $759 (shipping cost unclear); 36" in diameter (Pros: extensive color options, hidden storage, well-reviewed // Cons: smaller than I hoped)
Home Decorators Collection Custom Abingdon Upholstered Ottoman: $519 + $15 shipping; 36" square (Pros: lots of color and fabric options // Cons: assembly required, not in love with the multi-ball feet)
Home Decorators Collection Riemman Ottoman: $519 + $60 shipping; 39" in diameter (Pros: uncomplicated shape, simple ball feet // Cons: few color options, many of which are microsuede -- not my favorite)
Cara Round Ottoman via One Kings Lane: $579 (shipping cost unclear); 39" in diameter (Pros: available in a number of colors (via search by product name) // Cons: too many "buttons", a bit short at 16")
Ballard Designs Carmel Cocktail Ottoman: $589 to $904 (shipping cost unclear); 45.5" square  (Pros: hidden feet, plenty of colors and fabrics // Cons: may just feel too big)
Serena & Lily Chelsea Ottoman: $895 + $150 handling; 43" square (Pros: endless color options for both the fabric and feet // Cons: high handling cost, no storage)
Blu Dot Paramount Ottoman via Wayfair: $899 + variable shipping cost; 40" square (Pros: simple, streamlined design // Cons: limited color options, may be too modern for our space, silver feet may not match our decor)
Pottery Barn Caden Leather Square Ottoman: $1099 + $40 delivery surcharge; 42" square (Pros: lower storage, nailhead trim // Cons: maybe too rustic or masculine for our space)

The number of option seems daunting, but gathering them in one place makes it feel less frightening. I would love your input on the matter, along with any other tips you have for making your living room kid-friendly. I am all ears! xoxo {av}

patio style challenge -- revealed!


I am so excited to finally reveal the results of my Patio Style Challenge post with The Home Depot! Turning our empty deck into a backyard oasis was just what the doctor ordered after the brutal New England winter. {cv} and I hadn't invested much thought in our outdoor space. When The Home Depot offered me the chance to work on this project, I jumped on it! I spent a good deal of time at three of my local stores during this challenge. Their staff amazed me with their expertise and patience. Though the cold weather threw things off a bit (and subsequently killed my basil -- boo!), we were able to capture the patio on the one nice day in a very long string of rainy days. Here are a few teaser images from the day...


The "placemat" below is actually a marble tile cut to 12" x 14" by a friendly Home Depot employee. I added a few felt pads to keep the scratches to a minimum. These beauties won't blow away and they'll survive in any weather. I am just a little bit obsessed.


Since our home is in the Ocean State, we had to pay homage to its nautical roots. I created these rope coasters, which could be made in a number of sizes, to use under pots of plants on the deck and under hot plates on our patio set. They add an extra splash of color and definitely gave the space a nautical vibe! (If you want to make your own, you only need rope, a glue gun, some masking tape, a utility knife and a lighter. For all the details, check out my post for The Home Depot here.) 


I must give BIG props to my sweet friend, Bree Hester. She took the photos for this post and completely knocked it out of the park! Bree was an absolute lifesaver the day of the shoot -- I seriously couldn't have done it without her. Credit must also be given to my dear friend, Meredith, for whipping up my chicken scratch designs into those nautically inspired pillows. She is a rockstar. Last but certainly not least, I am so grateful to The Home Depot team for making this post possible. We cannot wait to share this space with our friends and family in the coming months. I hope you love it too. xoxo {av}


This post was made possible by the generous support of The Home Depot. They provided me with the patio set and a gift card to cover some other costs associated with this project. All opinions are my own. Many thanks for your support of brands that support long distance loving.

we made it!


Hello there! Remember me!? I apologize for dropping off the face of the planet... we were just moving into our house! While there are a few odds and ends which still need to be completed, {cv} and I are officially in our home. The build itself only took six months, but the project was three years in the making. With so much to be grateful for this year, it was only appropriate {cv} and I were handed the keys the week of Thanksgiving. 

Time is of the essence to get settled in the house before baby {v} arrives. I'm officially 39 weeks and on baby watch. As evidenced in the photo above, my bump is in full force! While I thought maternity leave would give me a bit more time to blog, the final push to finish the house and pack up our apartment stole that down time. I decided to forgo the conventional gift guide posts for a few pages devoted to special sets of people in your life.

From your best girl friend to your sweet Aunt Sally, take a peek for a few ideas to make her holiday extra special. Take care of the men in your life with a quick look here. For ideas across the spending spectrum (under $25, $50 + $100), these cost-conscious ideas are for you. Finally, if you have a new mom or tiny tot on your gift list, get the ball rolling here. You can also click through below to find these gift ideas lickety split!


If baby {v} arrives a few days before his or her due date, it may be a few weeks before you hear from me again. It goes without saying that my new little family must come first. I want to soak up this special time to the nth degree (and I hope you'll understand). Instagram, Facebook and Twitter are the best ways to stay in touch for all the latest updates from yours truly. I promise little peeks of the house (and baby!) in the coming weeks. Many thanks for your patience and understanding -- I can't tell you how much I appreciate it. This holiday season is sure to be one for the memory books :) xoxo {av}

P.S. I'll continue to add gift ideas to the above pages between now and Christmas, so keep checking back if you're stumped with your shopping list!

eight shades of gray (paint).

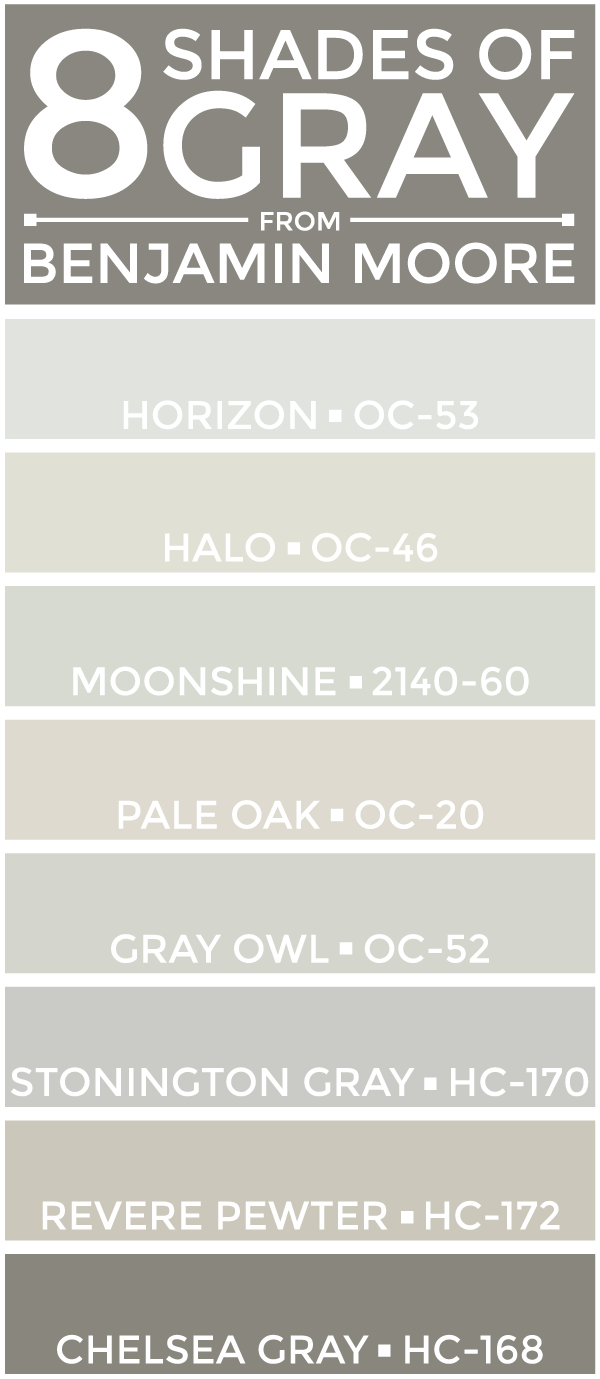
eight great shades of gray from @benjamin_moore -- perfect for a neutral color palette.


A few weeks back, I asked for your advice on choosing the right paint for your home. Your responses were incredibly thoughtful and insightful. Not only did your input guide the decisions we made, it allowed me to maintain some shred of sanity in the final days of our build. Though we didn't go with an entirely gray color palette for the #bartonbuild, it is definitely prevalent throughout our home.  I tested these hues in every room and also did a side-by-side comparison (which I tried and failed to capture with my iPhone). After a ton of deliberation, these are the colors we chose for the aforementioned spaces:

Open-Concept Kitchen, Living Room + Foyer: Benjamin Moore Revere Pewter (HC-172) Since this space spans two floors, we needed something that would pop against our trim and this hue did the trick. In person, Revere Pewter shows tan in some lights and gray in others. We were pleased with how it warmed up our home -- without making it too dark.

Guest Bedroom + OfficeBenjamin Moore Gray Owl (OC-52) These two rooms receive the first light in the morning. We went with Gray Owl for these spaces because it is a touch 'cooler' than some of the other grays we tried.

Nursery + Spare BedroomBenjamin Moore Stonington Gray (HC-170) If I'm being honest, we chose Stonington Gray for the nursery because it best matched the swatch for glider we chose. I kept it going in the other (mirrored) bedroom because the glider might one day move to that room. It is also slightly 'warmer; than Gray Owl in person.

Master BedroomBenjamin Moore Horizon (OC-53) Not to be confused with Horizon Gray (2141-50), Horizon was a last-minute addition to my sample options. Since we have a deep gray headboard (almost like the Chelsea Gray seen above), we didn't want anything too dark. Using our fabric swatch as a guide, we agreed this was a light enough hue without being a boring choice.

Master BathroomBenjamin Moore Gray Owl (OC-52) Our master bathroom is outfitted with some beautiful marble. Even in the absence of windows, the Carrara tile just popped next to Gray Owl.

The extras: The other bathrooms, mudroom, laundry room and master closet add a bit of color -- and another paint distributor -- to the mix. (I'll share those in another post soon!) 

Though it may look like it, this post was not sponsored by Benjamin Moore. I simply liked a few of their colors better and invested the majority of my research on their color families. I learned a lot about paint stores in this process. The biggest takeaway? Any paint store can use another distributor's color numbers as guides to create the paint. It may not be exact, but it comes out close. If you're worried about precision, it is best to trust that particular brand's experts. 

I loved nearly every shade of gray we tested, but some had to win. As always, this post isn't one-sided. If you have other grays you love which I missed, be sure to share them in the comments below. Thank you again for all of your wonderful insight in this process -- I can't wait to share some photos with the paint in action! xoxo {av}

barton build: an overdue update.


With fall only a few days away, I can officially say that this summer passed in a blink. The craziness of the last few months has prevented me from sharing updates on our #bartonbuild. Aside from an occasional snap on my Instagram feed,  I apologize for keeping you in the dark. We have made some serious progress since my last official update two months ago. I'll do my best to get you up to speed with this post!


First, a disclaimer: you will see plenty of miscellaneous boards, buckets, and dust throughout these photos. As much as I would like to make these glimpses picture-perfect, the reality is that we are in flux. I keep telling myself that the final product will be that much more exciting once the dust has lifted! Moving on...

I wish I could give a bulleted list of all that has been done in the last few months, but you would be reading a book {not a blog post}. From the street, the most visible change from my last update would be a completed exterior: the roof is on, the cedar shingles are installed, and the windows are in place. My favorite feature? THE PORCH. I'm already counting down to next spring when we can enjoy it!


Moving inside, it doesn't take a rocket scientist to see we are well beyond the framing stage. You can no longer see through our walls! Sheet rock was installed last week and it finally feels like a house when we walk in the front door. The picture above is a look from the edge of the kitchen into the living room. You can see space for built-ins on both sides of the fireplace {!!!}. I just can't get over all the yummy light.


Don't worry -- there will be railings on these stairs; they just aren't in place. The photo above is a look from the second floor down into the foyer. One day soon, there will be pretty light fixture suspended here. {We have to choose it first...} We really focused on creating an open space when you first walk through the door. Until the drywall was installed, it was hard to get a feel for the space. It is amazing what a difference it makes!


This photo was taken from the landing on the stairs, looking into the open concept living room and dining nook. The kitchen is off to the left, but the island will be visible from this view in the coming weeks. While there is still a fair amount to do, we have made some big decisions on the hardwood floors, appliances, and kitchen cabinets. Those aren't the only decisions we've made, but they are the ones which stand out the most.

Over the weekend, I made a pilgrimage to Benjamin Moore for paint samples {after all of your wonderful help!}. I still need to grab a few others, but we should hopefully have those choices nailed down later this week. We have some of the other finer details to choose as well, but we are on our way! Everyone warned us that the stress of building a home would be tough to juggle with a baby on the way, but we are taking it in stride. Since it is truly out of our hands, I don't ask about our move-in date. Our builder has been on "schedule" thus far, so we trust him to make it happen before baby {v} arrives. While we are taking it one day at a time, a mid-November completion would be quite the treat. 

As always, I am open to any and all bits of wisdom on homeownership. Are there any "little" things which might make a huge difference for us--while we still have the chance to make it happen? I promise more frequent #bartonbuild updates here on the blog, but follow along on Instagram for the most timely updates! xoxo {av}

choosing the right paint.

how to choose the right paint for your entire home.

Building a house from the ground up isn't all roses. While {cv} and I agree on most everything house-related, we are at a bit of a crossroads with the overall color scheme of the house. As my #bartonbuild board would attest, I gravitate heavily toward the white and gray tones. {cv} isn't opposed to this vision; he has simply expressed some concern that it could be too "basic". I think it's clean, but that's just me. These four examples only brush the surface of why I like these soft and subtle tones...

gray + white paint inspiration.
{top left: Gaylord Designs | top right: S.R. Gambrel | bottom left: abode love | bottom right: Terracotta Properties}

Since marriage is all about compromise, I realize I may have to bend a bit on this gray and white dream. I simply want to hear all sides of the story before the construction crew goes to town with a paintbrush. With sheet rock going in next week, our builder has encouraged us to get the ball rolling on our paint colors. We are a few weeks away from the final call, but I would love to get a few opinions on how you handled paint choices in your home. 
  • Did you do the same "base" color throughout your house? If so, how did you go about choosing that one color? It seems like an incredibly daunting process to pick just one! With the light a bit different in all corners of the house, I feel like it would be difficult to choose one that is universally wonderful. {If you know of any such universally wonderful colors, help a lady out!}
  • If you chose to pick colors room by room, how did you make those decisions -- especially in advance of other big decisions like furniture? Since we currently live in a two-bedroom apartment and will be moving into a two-story home, we will have to furnish the house over time -- not overnight. While I wish it was in our budget to just get it done in one fell swoop, it isn't a reality. I want the house to have character, without regretting the choice when we finally do have the chance to add pieces of furniture over time.
  • What tips would you give for deciding on colors? Did you paint a small section and look at it over the course of the day? True story: I have chosen the paint color for one room in my entire life. I failed miserably with a horribly dark caramel color in an already dark bedroom. It felt like I was living in a cave the entire year I lived there. I know paint can be easily changed, but I would rather not have to do much changing once we get in the house with a little one. 
While this post seems to prompt that I know what I'm doing here, I can only anticipate that your comments will be the backbone of this post. {I just ask way too many questions!} One thing is for certain: I can always count on my readers for the best advice. I sincerely appreciate your lifeline to sanity during this house-building process. You're the paint on my paintbrush -- in other words, absolutely essential to the final product. A big thank you in advance! xoxo {av}

P.S. Have any favorite grays or whites? Be sure to share them below! I want to round up a few fan favorites! Merci :)


barton build: weeks two to five.


I hope you all had a marvelous 4th of July weekend! After a week away from the blog, I am excited to be back with another update on our house build process. Since my last #bartonbuild post, it is mind-blowing to see how far we have come in the last three weeks. As our builder promised, things have started to take shape. Even better, we actually have something today which resembles a house!


I drive by our lot frequently during the week because it is in my territory for work. I feel like a serious creeper when I stop for photos, but sometimes, I bring cookies to our crew and feel a little less creepy. We have been incredibly grateful for a mostly sunny June. The biggest rain delay we could have encountered fell on the 4th of July weekend {thanks to Tropical Storm Arthur}. When we stopped by the build on our way home from Cape Cod, we were relieved and excited to see zero damage and even more progress. Most of the rooms have actually been framed out inside, so it is exciting to walk through our house and get a better idea on how everything works spatially. We couldn't be more in love with how it is all turning out. 

As an aside, the structure on the left side of the house is {not surprisingly} our garage. We decided on a 2.5 car garage to help accommodate {cv}'s bicycling obsession. No, it does not mean that our garage has two and a half doors; it just means that our two-car garage door is shifted slightly to one side for more space to house road bikes and lawn mowers. 


Though there are a few big things which need to happen before the house looks more like the one on our plans, I'm thrilled to say that the #bartonbuild is progressing right alongside my baby bump. All in all, we are counting our blessings for minimal headaches so far. I have a feeling the updates will soon be much less exciting once the framing is complete, but I promise to keep you posted on the progress. Have a fantastic start to your week--and thanks for following along! xoxo {av}

barton build: the first two weeks.


Hello again! Apologies for the radio silence for the past few days...we've been going at 110mph and blogging has taken a backseat. I'm back today to share updates from the first month of our house build. I'm sure the photos from later in the project will be more exciting, but for now, you get to see lots of dirt {yay!}. 

The first few weeks of our process only brought a few surprises, the biggest of which was the "flip" of our plan which delayed breaking ground 10 days. After the lot was cleared, it became abundantly obvious that building a driveway on a slope wasn't our best plan. With New England winters in mind, we wanted something more manageable for our cars and our snow shovels. The flip was an easy switch, but it necessitated a new plan approval process from the city. We also had to shift our septic plan about 20 feet, which required a visit from an environmental services professional. {Yes, we are far enough out that we need a septic system. We are going back to our rural roots--or something like that.} These two delays aside, things have been rocking and rolling on the house. You will see the slight progression from the giant hole to foundation planning then pouring below...


It may not look like much right now, but I can start seeing little glimpses of nights spent on our front porch. I can see busy mornings spent in our breakfast nook. I can see kids playing in the back yard. Above all, I know what a blessing it is for us to be in this stage of the process. We will have a house this year! The real question for us is this: which will come first -- the house or the baby? Both are due at roughly the same time. Time will tell, but we'll be grateful in whatever order they come. xoxo {av}